Sunday, November 1, 2015

Mental Math

A few weeks ago our district provided professional development.  It was presented by two fabulous teachers from within our district, one teaches 2nd grade the other 5th grade.  This makes for a great team, as presenting to staff from transitional kindergarten to sixth grade, this team of two teachers represents primary and upper grade.

They presented on the book Number Talks by Sherry Perish.

I had read this book a few years ago, with a primary mindset.   It was nice to revisit the book with a new upper grade mindset.  

When I taught kindergarten and first, I would have students do mental math, writing a problem on the board each day.  After the presentation I wanted to have the problems ready to go, instead of thinking of them on the fly.  So, I created a SmartBoard document that has 164 problems.  Plenty to get through the school year.  

I began as our trainers suggested.  I have all students give me a thumbs down in front of their chest, to show me they are ready to see the problem.  Once I display the problem, they are to put their thumb sideways to show me they are thinking about the problem, once they have 1 way to solve it, they turn their thumb up, if they can solve it multiple ways they put more fingers out, so I can see how many strategies they have to solve the one problem.  The thumb in front of the chest helps them not be embarrassed if they take a long time solving it, no one really can see their thumb except me.  This whole process is completely silent.  I have told the students they can not talk, because this is mental math, they need all their brainpower to solve the problem.  They are not allowed to have anything on their desks.  

 I have started the SmartBoard lesson very basic, with an array of shapes.  This way every student in the class can solve it.  When I displayed this first slide, I asked the class, "How many shapes are there?", I then ask 5 different students and I write down their answers, if they have the same answer as a student before them I circle that answer.  I do not say which answer is right or wrong.  Then I ask, "Who would like to defend one of these answers?"  They then tell me the steps they used to get the answer, after I write the steps down, I turn to the class and ask, "Does anyone have a different way?"  I go through this until no one is raising their hand or I've run out of time.  

I loved doing this quick activity.  It allows others to hear how their peers solved the problem.  They also see there are multiple ways to get the same answer.  

After 5 shape slides, I went into 5 slides of addition facts, their sum does not go over 10.  When we got to the addition problem students started giving me other equations that equaled the same answer.  So this was something I had to address.  I told them, they are not giving me another equation, instead they are telling me the steps their brain took to solve the equation.  After addressing that, I started to hear much better responses.  

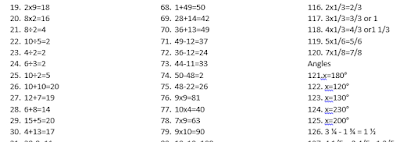
My SmartBoard lesson has 164 problems, but they are on the simpler side, I don't want this to be a time where no one can solve it in their head, instead, I want them to be able to solve it and then really be able to explain how they got there. Below is a screen shot of the problems and answers on the different slides.  As you can see, these problems are not the most difficult.


I created the "answer sheet", not because I needed the answer, but to see which slide had particular problems.  I also have the SmartBoard lesson saved on my computer, then when we solve an equation I write on that page and save it. I do this so I can keep track of which problems we have already solved, but I still have the clean one, in case, I want to go back to a problem.  

If you are not doing mental math in your classroom, I encourage you to give it a try.  Sometimes, it's crazy when the kids explain how they get to the answer, they will tell me steps I didn't think of.  

If you are interested in this product you can find it at my Teachers pay Teachers store.  

Thursday, October 22, 2015

Nearpod, I love you!

If you haven't played around with nearpod.com, you must.  You will fall in love with this website.  I learned about nearpod when I attended EdCamp 605.  People were talking about this "new" website that the students loved and the teachers loved, too.  Of course, I had no idea what this site was and when they compared it to kahoot I thought, this could be fun.  Others said, it's powerpoint on steroids, I thought of Prezi.  Well, the description of a powerpoint on steroids, does not do this site justice.

After attending EdCamp, (if you've read my previous posts, you know that's another thing I love) the next morning with my husband still snoozing away, I fixed myself a cup of coffee and thought let me just check out what all of the excitement's about.  After I signed up, I still didn't quite understand what this site did.  I had to explore, do the same, you won't regret it.  When you click on "Explore", this takes you to a ton of lessons.  There are many free lessons, so don't purchase right away.  I suggest getting a free one.  When you do, it will go into your "library". I suggest you go to your library click on it, then assign it as homework.  When you do this it will give you a session code.  Open another tab and log in as a student and navigate through the lesson.  If you aren't impressed with that lesson, try another, you're bound to be impressed.  OK, I thought, this is cool.

But I couldn't find a lesson that fit quite what I wanted.  So, I decided I'd create one.  My students had just finished reading James and the Giant Peach, I hadn't taught them much about the author.  I went in and got to work, within 20 minutes I created a complete lesson.  I couldn't wait to go in to use it.  The kids absolutely loved it.  I assigned it as a live presentation, in this mode, you control which "slide" they look at.  I embedded a youtube.com video and was not sure how that would work, as students in my district are not allowed to go on youtube.  So, in this case, the video did not play on their chromebooks, but because I controlled the screen I just had them all look up at the smartboard and we watched the video together.  As students finish each "slide" you get instant results.   When they are all done, you can click on "reports" and see everyone's results.  Love it.

So, I learned that in "live" mode I control the screen, in "homework" mode the students go at their own pace.  In live mode, if a child accidentally exits out they can go right back in and it picks right back up (not true in homework mode).  The session code is always in the left corner of your screen.  Or they have now learned they can look at a neighbor's screen and at the end of their url is the session code.

I was using it for math, absolutely loved it.  As I had not had "drivers" and "navigators" before on a shared device, I began my lesson with the video on pair coding.  We were doing multiplication using the area model.  I created a word document with the multiplication problem on top and a rectangle for the area model, then I uploaded it onto a "draw it" slide.  I played it in "live" mode, they then had to work together in pairs to solve the math problem.  I showed their answers on the smartboard.  Of course there were a few wrong answers, which I thought was great LEARNING MOMENT!  We worked through the incorrect problems and found the mistake.  There was such great interaction between the pairs of students.  They were so engaged.  My principal walked in while they were doing this math lesson.  She asked what they were doing. I told her and she stayed for the whole lesson.  She was very impressed how every single student in my classroom was engaged in the lesson.

So playing you may find these things that you are not impressed with:  when you assign the fill-in the blank activity you can not see their results and when you share a lesson you created with another teacher they can only view it not assign it to their class.  I contacted the company and asked about this.  If you have the paid version, you get all of those things.  Right now they are having a sale, purchase 10 licenses get 10 free, in my view that is an awesome deal.

I have told my entire site about this website and every teacher I come in contact with.  This is a super easy to use and navigate resource.  I hope you fall in love with it too!

Don't forget to check out my store at TeachersPayTeachers.

Sunday, October 11, 2015

Computer Science at the Elementary Level

I am not as computer savvy as the younger generation just entering into teaching, but I am not afraid of the computer.  Our students were born into a world where all they have ever known were computers in their lives.  The only computer class I took in high school had only the old apples or commodore 64s.  The new generation of teachers have probably never touched either of these.  I took a computer class in college, which just had me play with a few programs we might use when we had our own classroom.  So computer science is very foreign to me.

Last year I wanted to learn more about this whole "hour of code".  So I read up on it and visited code.org.  According to the site, this is part of computer science and anyone can do it.  I went through the tutorials and decided I really liked it and it had value to my students.  I put my first graders on it.  They absolutely loved it!  What I liked about it, was that sometimes students had to struggle through the puzzle.  They'd raise their hand and ask me to help I'd tell them I'd sit next to them as they gave it another try.  They always figured it out, maybe after multiple tries, but they did it.  The excitement was there, many students went home and completed puzzles at home on their own. So I'd say I dabbled in coding last year.

This year, our district invited a representative from the Orange County Department of Education out, to teach us about Code.org.  Our district offered this unpaid professional development to anyone who'd like to attend on a Saturday.  I know it's very difficult to give up a Saturday and not be paid, but I was that interested in learning more.  It was a long training, 9:00 to 3:00, but I now feel I understand a little more about coding.  We had to complete 10 puzzles, it was funny to see adults struggling through puzzles that kids complete so quickly.  We each received a teacher's manual which had "unplugged" lessons in it.  These are lessons you can do with your students that do not require a computer.  My group thought there were some great lessons in the manual.  Although, we received a teachers manual with all the lessons, those lessons can also be found on their website.  We were broken into grade level groups and had to teach the lesson to the group of adults in attendance.  That was a learning experience.  It was nice to see what a lesson looks like in a kindergarten class versus a sixth grade class. 

If you are new to computer science and you would like to learn more, our trainer said that through most Department of Education offices there are trainers like her that go out to sites and train.  They are always free, but very often take place on a Saturday.  If you'd like to dabble, like I did last year, one of the things I learned was, if you would like to do this with non-readers to beginning readers, it is very do-able.  My first graders loved it, but what you want to do is start them in course 1.  If you have readers about second grade or higher reading level you want to start them in course 2.  If you start any higher then this, students may not understand what they are doing, as course 3 is based on things they learned in course 2.  I have students in my class this year that are reading at a first grade level and others reading at a fourth grade level, for this reason I have a few students starting in course 1 with the majority starting in course 2.  So, you do have the ability to have 2 different courses going. 

I'm writing this in hopes that there are other educators out there who are trying to figure this all out (maybe you are from the generation, where you weren't born with computers in your life) now have a place to begin.  This site is set up so it is very teacher friendly, even to those who aren't computer savvy.  AND don't be afraid to tell your students you don't know, but you will sit next to them and help them out.  I did that plenty my first year and will be doing that this year as well.

Happy Teaching!
You may want to check out my Teachers Pay Teachers store and don't forget to follow me.

Wednesday, July 8, 2015

Standard Mapping

I will be teaching a new grade level, 4th, next year.  (Argh!)  I am excited about it, but nervous at the same time.  To prepare for this change of grade level, I wanted to map my standards out for the year.  In order to do this, I've printed all of my standards on post-its.  You can find this free resource on my TPT page.  Printing on post-its can be a little tricky the first time you do this.  I print one page without post-its, so I know where my post-its will be placed then I put my post-its on the page, like this:

I then can put blank paper on top of this one and I know where to place my post-its.  Make sure all of the sticky edges of the post-it are the same direction, on top.  You will need them facing the same way so they do not jam your printer.  Before I print on post-its I use a blank page and draw an arrow on it, and run that through the printer.  This tells me which way the paper is pulled through the printer when it is printing.  When I place my post-it paper in the printer I make sure my sticky edges of the printer will be pulled through first.  I also make sure all of my post-its are all the way down, you don't want a corner sticking up, which may jam your printer.  If you have the edge that is not sticky being pulled through first, you may jam your printer as the post-its may lift off of the paper. After I've done all of this it's time to print.  I'm overly cautious and will only print 1 page at a time.  After printing, your page should look like this:


I have ELA, Math, History Social Studies, and Next Generation Science standards, so I pick 4 color post-its to easily see the subjects.  I use chart paper and divide my paper into subjects and decide how to divide my time line.   In this case I wanted to divide it into trimesters.  My paper looks like this:

I then go through and plot my standards.  I place the post-its on the time line as to when I will be introducing each standard.  The final chart looks like this:

I then transfer my information into a word document.  BUT I keep this timeline all year.  I love having them on post-its because as I teach I might find that a standard I thought would be introduced in 3rd trimester really is introduced in 2nd trimester, I can easily pull it off and move it.  I then have a record for next year.  I hope you find this useful in your planning of the year.

You may want to visit my store.  At the time of this post many items are kindergarten and first grade related.  I'm sure I will be posting more 4th grade items.

https://www.teacherspayteachers.com/Store/Gina-Hickerson


July 15, 2015 - I just finished watching a webinar by Dr. Jayme Linton.  She suggested mapping your standards by the verb, looking at the difficulty level of each standard.  This way you can introduce less difficult standards before the more difficult ones.  She suggests mapping the standards on a grid similar to this:

You could use the post-its if you were doing this with your PLC, this way you could discuss and move post-its, then when complete a word document could be created.  If you'd like to use the word document please click here and I've already created for you.


Saturday, July 4, 2015

Recall Games/Activities


I have finally sat down and completed my SmartBoard game with addition and subtraction problems.  I've had one created for kindergarten with a few facts, but I wanted to make one that is specific to addition and another specific to subtraction.  Pages getting more difficult as the class progresses through the game. 

My class has loved playing these SmartBoard games.  I have students throw a Koosh Ball at the SmartBoard and the circle disappears and exposes the problem underneath.  What I have found through playing this is that you have to find a Koosh Ball that has some weight to it.  The very light ones will not trigger the circle to disappear.  What is a Koosh Ball?  Well it looks like this:
Image result for koosh ball.png

I also use an elongated squishy ball, that has a ball inside of it, this gives it enough weight to trigger the circle to disappear.  Mine is similar to these:
 Image result for long koosh ball


While I see my students enjoy these games, I've wondered, are they really learning from them?  So I've done some research, this quote, "There is also evidence that games allow students to focus well enough to learn better." Lepper and Cordova, 1992 struck me.  The way I play the game is, half of the class is a team and the other half the opposing team, my rule is only the person who's turn it is may speak.  As it is only one child's turn, you'd think kindergarten and first grade students would become antsy, but they don't they are intently waiting for the problem or word to appear and they are waiting to see if the child gets the answer correctly.  This quote supports that, they have more focus during our game then compared to sitting down completing a worksheet. The above quote was from the article, Why Use Games to Teach?   The article continues by talking about how kids today are immersed in technology, we need to be supporting this.  And playing educational games in technology help do this. 

Those of us that teach the very young, see everyday how they learn through play.  They use their imagination and they problem solve.  It feels like as a kindergarten teacher, we give our students less and less time for that imaginary play, but it is such an important part of learning.  This article talks about a longitudinal study on play, How Do Young Children Learn Through Play?

Upon further research, I may want to call my game an activity.  This article defines games Learning Mathematics Through Games.  We as teachers often times feel like we have to justify why we are using a game to teach.  When an administrator walks in, I know I fear it looks like we are "playing", but I have to come to realize that playing is a huge part of learning.

These games/activities I've created are based on recall, recall is the lowest domain on Blooms Taxonomy, but if students can not quickly recall they will have difficulty moving up Blooms Taxonomy as tasks get harder.  Recall helps build working memory.  As I researched I found many recall games/activities.  This is a list of pretty good resources, http://www.memory-improvement-tips.com/free-memory-games.html

I have always played games as a class or have a game in a center.  I think if you purposefully choose a game that fits what you are teaching or what students are learning about, it is a great way to make learning fun and purposeful.  It helps that subject come alive for students.  If a teacher is just throwing a bunch of games out there that do not tie to anything that is being taught, kids are still learning from playing, but they are not making connections.  We need to help students make connections, build a love for learning, and make learning fun!


Sunday, June 7, 2015

How Educating Parents, Educated Me

Last week I had my final for my leadership class.  At the end of last year's class we each had to pick a project to incorporate a new program, training, education, etc... into our district or our site for this school year.  There are a group of teachers from our district that were enrolled in this class with me.  They are a group of amazing educators, all passionate about what they do.  They have taught me how to better present myself.  Our group project goal was, to get more parents involved in parent trainings that were held district wide.  I've never presented at another school site, let alone, an audience of people that I had not met before.

Our parent trainings were in Common Core, in some circles, uttering these words is a death sentence.  In others, they are the best two words recently introduced into the education system.  Our group was broken into teams, myself and another educator were in charge of educating our parents in common core math.  This was where I challenged myself.  My masters is in reading, I've been a GLAD trainer, science trainer, and currently a Thinking Maps trainer focusing on writing.  I can say, I've never been a math trainer, or felt I was very strong in math, myself.  One of the activities that we presented was, take one standard and follow it from kindergarten to sixth grade.  The students who attended had fun trying to solve the problems for each grade level.  Parents occasionally struggled with terminology or how to execute the problem.  I felt after that evening more families saw how students had to have a conceptual understanding to move onto the next grade level math standards.  I also saw adults and children who approached the same problem very differently.

 For our final we had to present a PowerPoint and discuss what we had worked on this school year.  There were a panel of 2 people from the Orange County Department of Education who were judging us, along with a person from the year 1 leadership class who watched us.  In this class I worked on "seeking out challenging opportunities that test my own skills and abilities."  Which I sure did.

I'm happy to report, that I passed my class.  

But going through this process I began to think about how each of us interpret a math problem and it's solution.  I've always known every child does not think the same.  I've, also, always asked students about their thinking, but I think so often the other students tune out.  It's difficult for a first grader to articulate what they are thinking.  So, I began using the app Educreations.  Students began to be able to articulate their thinking.

The app looks like this.  When I signed up it was free.  You can upgrade to the pro which has an annual fee.


When we began word problems, I modeled several times how to solve problems, how to pull out the important information, and how I would write the word problem in a number sentence.  I still had many in the class that just couldn't figure out which numbers to use and what to do with those numbers.  So, I started taking pictures of the word problem and having students who were consistently solving the problems correctly think out loud and record themselves doing so.  I would then play these back for the class.   When I played them back the class was silent (anything on the SmartBoard and it has their attention) and I'd hear some "Ohs!" as it played.  I believe playing other student's thinking for the class really helped kids who weren't getting it, get it.  Here is a quick example:
What is nice about this, once I taught the children how to use this app, I could continue teaching the whole class and they could use educreations on their own.  

What I also learned when doing this is, sometimes, students are confused.  Here is an example of that:
This child was consistently getting them right, but he always had "extra stuff".  After watching this, I understood that he thought he had to make a number bond somewhere in his problem.  He did not understand that number bonds are used with purpose.  So, I had a mini lesson with him to help him understand this.  

Educreations could easily be incorporated into other subjects.  I found it just lent itself so nicely to math.  

If you can't get on the internet in your district once you download the app, you can do exactly what my students did without internet connection.   Educreations also has lessons that have been shared by others that you have access to, but you would need to have internet in order to view these.  

And those of you that have a SmartBoard, and your school is not an apple school.   If you bring in your own ipad and do this, you can purchase a VGA Adapter and then you can watch what your students have created on your SmartBoard.  I purchased my adapter on Amazon for less that $20.  

Educreations is a simple app that you might find useful in your teaching.  We often don't have time to listen to each one of our student's thinking process, but using this app it sure did help me listen to a few more students I might not have had time for.

Don't forget to take a look at my TeachersPayTeachers store:  Gina Hickerson's Store


Saturday, May 9, 2015

Twitter? Why do I need that?

So, I spent another Saturday in EdCamp and on top of that drove over an hour to get there.  Crazy, I know.  But the learning!!!  So, at the last EdCamp, everyone kept telling the audience, as a teacher, twitter is very powerful.  I've had a twitter account for years, but just "didn't get it".  I've now been active on it for a few months, but have only been "lurking" as I found out today.  When I look up "lurking" in the urban dictionary, the definition is:


Ok, yes that defines my "activity" on twitter. 

I've watched youtube videos to learn how to use twitter.  I learned some things.  This is the one I found most useful  https://www.youtube.com/watch?https://www.youtube.com/watch?v=Y0mLVEvIWa8 all of the ones by OpenSesame were helpful. But I still had some unanswered questions and so did the audience in EdCamp. 

So, attending EdCamp today I went to a session on Twitter and had my questions answered.  You might have those same questions.

Why the hashtag?  Answer:  the words after the hashtag make it easy to search for items of interest.  a great one to search is #edchat.  So much great info!

Why do some tweets start with @?  Answer:  a person's handle (username) has that sign in front of it.  For example I'm @Gina_Hickerson.  So some tweets start that way, because they are "tagging" that person in their tweet.

How do I know who I'm talking to?  Answer:  If you want to talk to someone, include that person's handle somewhere within the tweet, then that person sees your tweet along with people who follow both of you.  If you want all of your followers to see your tweet, just tweet.  If you want all of their followers to see what you say, you have to put a period in front of the handle, for example, .@Gina_Hickerson.  If you'd like to talk to someone privately, first of all, you can only have a private messages with people that you follow and they follow you.   Go to the upper left hand corner and click on message.  Put the other person's handle in and then press next.  You can then privately message them.

I try to follow a stream of conversation, but sometimes it doesn't make sense, why?  Answer:  If you are looking at twitter on your phone you won't see everyone's tweet, if you are using a computer you will.

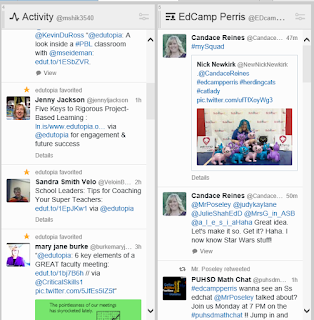
It is a little overwhelming, how do I follow a chat?  Answer:  Open www.tweetdeck.com, on tweetdeck you can create lists.  For instance on the below picture I created EdCamp Perris list, so I could read the tweets as they came through during EdCamp. 


This will be extremely useful when you are part of an EdChat. 

What's an EdChat?  Answer:  An educator will pose educational questions and set a time that people can tweet answers and share resources.  Below is an example:


When you respond, you have to let followers know which question you are answering.  So, if I'm answering question 1, I'd begin my tweet with A1: then my response, you also need to include the name of the EdChat with a hashtag, for example if I want to chat on Google Apps for Education The hashtag is #gafechat.  Also, when tweeting in an EdChat use Ss to refer to students, Ts for teachers, and As for administrators. 

Want to see upcoming edchats?  Here's a great link:  edchat schedule

I found this information very helpful.  I will probably continue to be a lurker, until I feel more comfortable, but now I "get" twitter.  If you'd like to play with twitter, feel free to follow me and I will follow you back.  My handle is @Gina_Hickerson.

Don't forget to check out my TPT store:  Gina Hickerson


Monday, April 20, 2015

Symbaloo

I recently completed a webinar on useful websites for teachers.  One of the most useful I thought was called symbaloo.com.  This is a website that you can bookmark websites you frequent and you can categorize them.  It makes it really easy to have all of your websites in one location.  It's also super easy to set up.  I put on all the websites I use frequently, also websites I want to explore further.  For esample, my ELA webmix looks like this:


The tutorial is super quick and super easy.  You can either take a look at my pages (they call them webmixes) and if you want my whole webmix you can add it and it will appear in your symbaloo page.  Or creating your own is easy.  Adding a tile is simple, you just click in the middle of the tile, then choose create a tile.  I find it most easy to open the website I want in another window, copy the address and then paste it into the box asking for the website address.  Most of the time an image will automatically pop up on your tile.  One thing I didn't catch on right away, is if the image doesn't include the name of the website you might want to include that, so in the next box "name on the tile" type the name you want and check the box "show text".  When you do this anything you want to name it, will appear.  If a picture doesn't automatically appear you can then design your own, with a color background and choices of icons.  You can also lock webmixes, so if you were to share your link people couldn't see any of the locked ones.  Here are my symbaloo links if you'd like to take a look at mine:
Math          English Language Arts       Science       History and Social Studies      Art     
Thinking Maps        
I have mine categorized by subject.  Of course many of the sites are geared to primary, but I do know I have some that I haven't played with yet which might also be upper grade appropriate. 

I've also created a page of my own personal favorites, like pinterest, TPT, I won't share that one with you.  I've only been playing with it for a few months, so I don't have a whole lot.   I'm sure mine will be growing.  You can continue to use my links, but if you were planning on building your own symbaloo, it might save you time seeing what I have and copying my links.  Have fun!

You might also want to visit my TeachersPayTeachers store.  If you like what you see, don't forget to follow me.

Also, did you know if you leave feedback for items that you purchase on TPT you earn credits?  You earn 1 credit for each dollar spent.  Every 100 credits is equivalent to $5.  Then when you go to check out you can apply your credits and it deducts that amount from your total.  Before you leave negative feedback to any seller you should contact the seller first, they may not be aware of your concerns.  For instance type-o's can be fixed and then re-uploaded, you get the fixed version and any updates the seller makes. 

Sunday, April 12, 2015

Teaching Conferences

I love going to conferences.  I always feel like there is something to learn.  Yesterday, I went to a conference, I won't say which one, but it was a waste of my time.  If you are reading this and you are someone who provides professional development, I'm going to let you know what you shouldn't do. The presenter started off saying, "I know you already do this, but it's a good reminder."  If we already know how to do it, why are we paying to listen to you tell us how?  This presenter started out by telling us, we have different kind of learners in our classroom and went into detail as to what kind and what each learner needs.  (Duh!)  Next subject, when we'd like our students to partner share, make sure they are looking at each other, we can do this by telling students to have eye to eye contact, ear to ear sharing, or knee to knee.  (Come on!  Teachers fresh out of student teaching know this!)  This whole thing, plus him introducing himself and telling us about his teaching experience took 1 hour.  (REALLY?!)
We then go on and he instructs us that student writing is a great way to find out what students know about a subject and what they are curious about.  (I gave up a Saturday for this?)  He then has the audience model what he's teaching us about.  Which was to write letters to each other as a way to have students dialogue about the subject.  He gave us a subject and we wrote to other teachers at our table on his choice of a subject "aliens".  This took us up to break.  Now the sells pitch.  He was so gracious to bring the publisher of his books and guess what?  They were selling all of his books in the lobby.  How convenient!  (Can you hear my sarcasm?)
The break was supposed to be 15 minutes, it went on for 25 minutes.  (Please honor our time!)  He tries to get our attention at the conclusion of the break (I know, I know, teachers are the worse) when the audience does not quiet down, he passes the mic to someone in the audience and she uses her attention getting strategy to draw the audience back to attention.  Ok, so now an audience member has us back from break.  He shares for 45 minutes which schools throughout the country he has worked with and letters he has seen or received from students.  Show us 1-3 that get us laughing and break up the day, NOT 45 minutes worth of student letters.
We are to again model what students should be doing, which is to find a question to answer.  He gave us 15 minutes to hear each other's questions and pick one.  Now it's time to investigate and find the answers to our questions.  30 minutes for this activity, which we needed since so many of us were on the internet and it took so long to search.  Time to share out, he picks teams from the audience to share their question and the answers they found.  Guess what?  He doesn't pick one or two, for us to get the idea and move on.  No, instead, we have to listen to 6 different teams share out their question and the answers they found.
Lunch time!  I stayed for lunch and then I left.   I always say I can learn something from a conference.  This is what I learned: When presenting honor your audience's time.   Saying we have a 15 minute break, stick to that.  When giving examples give one or two, to get the idea, NOT 6!  Don't start a training with "You already know this" and then review learning styles and how students should partner share.  (ARGH!)
I apologize that this month's post is more of a rant, but I think we've all experienced these types of presenters and the frustration one feels, after giving up their time, or pay their hard earned money. I know there is an app out there called rate your instructor.  Is there one out there called "Rate your Presenter"?  If not, someone ought to create it, I'd pay for it.

Don't forget to visit my store at:  https://www.teacherspayteachers.com/Store/Gina-Hickerson
If you'd like to email me my email address is:  hickerson.gina@gmail.com

Saturday, March 21, 2015

Good Teaching Conference in San Diego

I always get inspired when I go to a teaching conference.  If you've never been to a Good Teaching Conference in your state, I would suggest you try to go at least once.  They invite presenters who are very knowledgeable.  I've always left with new ideas and things I want to try with my own class.

I learned about a few free resources that I thought others who were not aware of may benefit from.  Did you know if you go to http://www.pbslearningmedia.org/ then click on the subject there are videos for students and most of them have extension activities.  They also tell you which standards they are aligned to.  A great resource to be aware of.

The next website is http://betterlesson.com/.  This site has lessons that great teachers have created.

Then there was https://www.mydigitalchalkboard.org/.  Another site where lessons are posted.  You do have to join the community to have access to their lessons.  You can choose your lesson and topic.

One of the sessions I went to was how to put Engineering into STEM in the primary grades.  A resource she spoke about was http://eie.org/.  This is a resource for purchasing lessons.  She did say if you were interested in the binder, you could purchase just that, then go to the 99 Cents Store to purchase all of the supplies, rather than purchasing the whole kit.  She says she's bought 5 of them and the first time she bought the kit.  The next 4 she only purchased the binder and said she was able to find 99% of the items used in the engineering binder at the 99 Cents Store. 

I thought I'd share these resources with you as most of them are free.   Thanks for visiting. 

Saturday, March 7, 2015

Edcamp is Awesome!!!!

Have you ever heard of edcamp?  I hadn't.  In the class I take, one of my classmates organized an edcamp at his school and encouraged us all to come.  It was local at Los Alamitos High School, so I decided to take a look.  I talked my fourth grade teacher friend into attending with me.  I was pretty sure I wouldn't get much out of it, he being a high school computer science teacher and myself a first grade teacher.  Boy, was I wrong!  So it begins with networking in the morning with munchies and coffee.  We are then directed to write down anything we'd like to learn more about or any topic we'd like to facilitate.  Then we are directed to place them on the following board:


We placed any post its with topics we'd like to or felt comfortable facilitating on the orange sign.


And anything we'd like to learn about on the purple sign.


There were a few people working the board, what I mean by this is, they were moving the post-its into similar topic groups.  Once it was time to begin, we were told to either look at the board or log-in to view the computer board.  We then picked which sessions we would attend and were encouraged not to sit through something we didn't find useful.  We sat through three sessions.  In those sessions the facilitator would begin by asking, what everyone's questions were and writing them on the board, then we'd go through and see if anyone in the room could answer those questions.  Smartboards and computers are on, so people could share ideas via the web, google docs, what ever.  It was within one of these sessions I learned about the app https://tellagami.com/.  An SDC teacher who has a non-communicative autism class was very excited to share her finding.  So, you can get the free app, which has limited characters and backgrounds, but the most limiting is that it only allows for 30 seconds of voice recording or text to speech (which is what her students were using).  If you upgrade to tellagami edu, you will get 90 seconds of voice or text to voice recording.  It is $4.99 and the app looks like this:
So I was so excited to get started, I began to use it on Monday.  The standard we are working on in science is how animals thrive in their environment.  So we had a home project where students created a habitat and then brought it to school.  I took a picture of the habitat, the students created their character then they spoke about their habitat.  I then put the link in a QR Reader maker, I used this free link to do that:  http://goqr.me/#t=url downloaded it and also put the link above that, with the child's name.  I then attached them to their project and asked parents to download a free qr reader for open house.  What a hit!  I work at a school where 97% of students are on free lunch, so I wasn't sure how many parents had smartphones.  I have a class of 27, 25 parents showed up, only 6 of those did not have a smartphone.  The rest did and when they watched their child's tellagami they loved it.  Here are a couple, either use your qr reader or the link to watch them.
https://tellagami.com/gami/6QKDCI/                                 https://tellagami.com/gami/W5AK81/
Preview of your QR Code                                 Preview of your QR Code

This was very easy to do.  In 2 days a few minutes each day, I created a class of 27 of these.  I used my phone or ipad then emailed the link to myself, after school I put them in the qr maker.  It was easy and I wowed my parents.  I also had principal walk throughs the day before open house, the principals, superintedent and assistant superintedent walked through my class and they were wowed, also!  You should have seen them going around with their QR Readers listening to the different mini reports.   If you've never heard of this app you've got to give it a try!


If you are interested in ed camp, you can get more information here:
http://edcamp.wikispaces.com/

Here is a super short youtube of the event:
https://www.youtube.com/watch?v=TOuIsqTBOjM

And don't forget to check out my TPT store:
https://www.teacherspayteachers.com/Store/Gina-Hickerson


Saturday, February 21, 2015

Reading with Our Littles

Use this link to see TPT's store wide sale.  Going on February 25th!

TPT store wide sale! February 25th!

I am a little bored of making the Engage NY assessments, I'm almost done with kindergarten, but I just can't bear to think about working on it.

So I'm doing something a little more fun.  Our district has not adopted new ELA textbooks in quite a while.  So we are still in OpenCourt.  It's the one that looks like this:

I have a group of high readers, the decodables are just way to easy for them.  So, my partner teacher pulled out this book.  What we found is that the questions that are asked are mostly connecting text to self, very few text dependent questions.  So, I sat down and started working on making little books for each of these stories, trying my best to only have 1 text to self question, the rest are text dependent where our young learners have to refer back to the text.  I often, orally ask them for the evidence to support their answers, now I'm trying to do it with paper and pencil.  If you'd like to look at one, visit my tpt page:  https://www.teacherspayteachers.com/Product/Comprehension-Questions-to-Arnold-Lobels-Strange-Bumps-1687620.  It's the Arnold Lobel story, Strange Bumps.  I've made every book similar trying to have 6 questions on the inside and one on the back, trying my best to make the one on the back the text to self, and making it the fun question.  My group of high readers have completed a few.  I am pleased with what I'm getting.  I often have to ask them to go back and write in a complete sentence, other than that, they are answering the questions and I see them looking through the book to find the answers.  I have only a few more stories and then it will be complete, once complete I will post on TPT.

March 2015, they are now complete, take a look:  https://www.teacherspayteachers.com/Product/Comprehension-Questions-for-OpenCourt-First-Grade-1724636
Thanks for visiting!

Saturday, January 10, 2015

High Frequency Word "books"

As I've said in a previous post, I teach 1 week and the next week I'm the district's Thinking Maps coach.  I do this with my teaching partner.  It has been very difficult...  I give anyone who shares a contract kudos.  We have an advantage where we are on site and can communicate with each other.  Each Monday, I feel like I'm walking into a new class.  Although we communicate often throughout the week, there is always something.  I love each job, but sharing both jobs is hard.

To take my mind off of work items, I enjoy computer work.  So I've been sitting in my living room and when my husband turns the TV on, I've been working on some high frequency word "books" we used when I taught kindergarten.  I always wanted to have the insides of every word book differentiated, I had worked on a few, but not the full set of 100 words.  In our district, kindergarten students have to be able to fluently read 100 words by June.  It's a difficult task, so many of our students start the year, never attending any type of preschool and they can't tell the difference between a letter, number, or shape.  We have a long road ahead of us each year.  Through the years I've used different things  others or myself have created and by trial and error had a very successful system.  Our site went to full day kindergarten about 7 years ago, since that time we have had an 85% or better success rate in our students learning 100 sight words.  (one year I even had 100% of my students learn 100 sight words)  One piece of it are these books that I've wanted to differentiate.  So, I've been working on those and when I have completed all 100 I will post these on TPT.  The following are a few pages I've included in the document, it gives you an idea of how we have used these books.  If you'd like to print out one of the books use this link:  http://www.livebinders.com/play/play?id=1615916 
March 2015 -  All books are complete here is the link to the bundle, if you only want 20 words you can follow the link on the TPT page.