Monday, April 8, 2019

Flipgrid Gives #StudentVoice

Flipgrid is an exciting resource to use.  As soon as I found out about it I began using it in my own classroom.  I was surprised to find many teachers in my district had never heard of it before.  So I started spreading the word. Flipgrid creates equity in the classroom.  Students who may be to shy to give an oral presentation really blossom on Flipgrid.  What is Flipgrid?  It's a website that allows teachers to pose a question or lesson and students can record themselves responding.  This year I am an Educational Technology TOSA for my district.  I have gone into multiple classes and have not encountered a student yet who would not record themselves.  Yes, I've had some hesitant students or students who have asked to go to a private location to film, but EVERY single student in every class has recorded themselves.  Meaning, I have always had 100% participation! #StudentVoice (There will be that exception, I'm sure. I just haven't experienced that child yet) This year I have used it with TK-6th grade classes and all students have easily navigated the site.  Flipgrid was recently purchased by Microsoft, so it is now a FREE website.  That was exciting news!
Flipgrid is great for all students. Your struggling reader loves it because you can record yourself giving directions, they do not have to read.  Of course, you could make your directions text. After listening to your directions students film a response.  The site will walk you through creating your educator account.  The site allows you to create a grid, I think of the grid as a binder, inside the grid are topics, I think of those as my tabs in my binder.  You decide how you want to organize this.  I had a grid for my own class and another for my partner teacher's class.  I taught both of our classes science.  This just helped me organize my assignments.  This year, as the Technology TOSA, I have a grid for each school.  Mine looks like this:


If I click on the grid, I will have assignments I have made for that school.  Creating an assignment is very simple.  Open the grid you'd like to make the assignment for, then click on "New Topic".
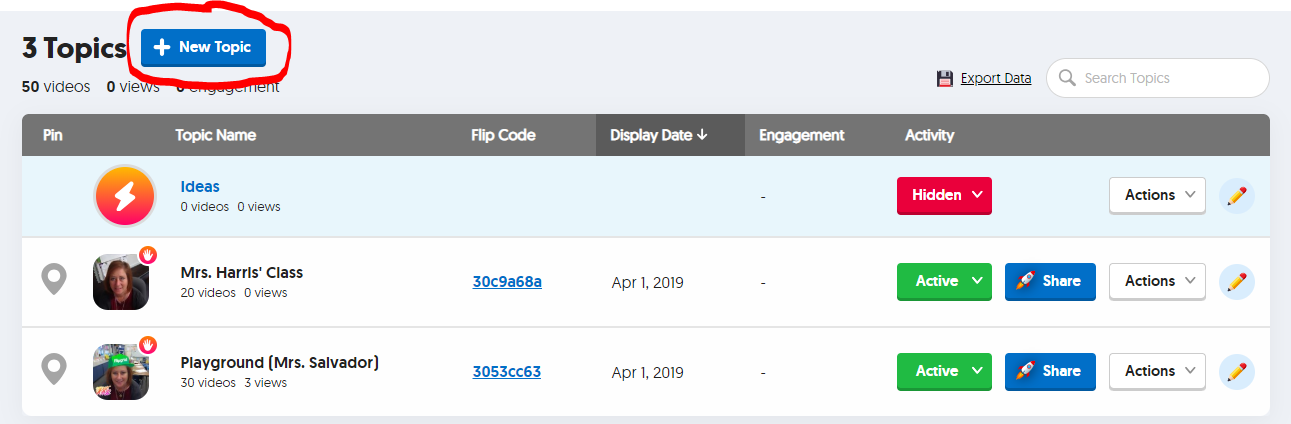
This takes you to the assignment.  There are items that are required and there are optional items.
You have to give it a title.  I rarely give a topic tip.  The video response time, I do suggest that you change this to about how long you think it will take.  If you make it too long, I have found that students try to fill up that whole entire time and I didn't always get quality responses.  Topic display date will auto-populate with the date you created the assignment.  You do have to add Topic Description/Question.  If I'm NOT using this for a listening and speaking assignment I will type exactly what I ask in my video.  If I want this to be a listening and speaking activity, I will just type, "Listen to the directions on the video".  This gives you some great data, because students can rewatch your directions as much as they like, if they ask you what they are supposed to do, it lets you know that they are struggling with listening skills.

In the topic privacy section the video moderation is turned off.  I suggest that you turn this on.  (You can always edit and change at a later time).  Turning this on will not make the videos public.  You will need to watch each one, once you approve them then the class can see them.  I suggest turning this on, for two reasons.  One if a student is giving an incorrect response you can catch it before it goes out to the class and the incorrect response causes a misconception for another student.  Two, if you have that child who thinks it's funny to be inappropriate, you can deal with that before other students see it.  You can change the Active status, if you don't want it to be visible to your students yet.  You can also change the launch date and freeze date.  This is great when you have a substitute, you can have it launch on that day.  The freeze date is great if it's an assessment.  This will freeze the assignment and students can't go back in.
This section is the fun part!  You can add any topic resource.  In our district YouTube is blocked, so students are unable to view YouTube videos.  So make sure you check that whatever you choose to add it is not blocked for students.  You can even add attachments!
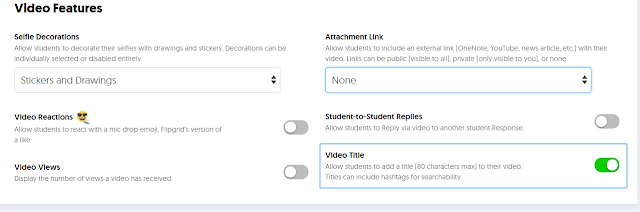
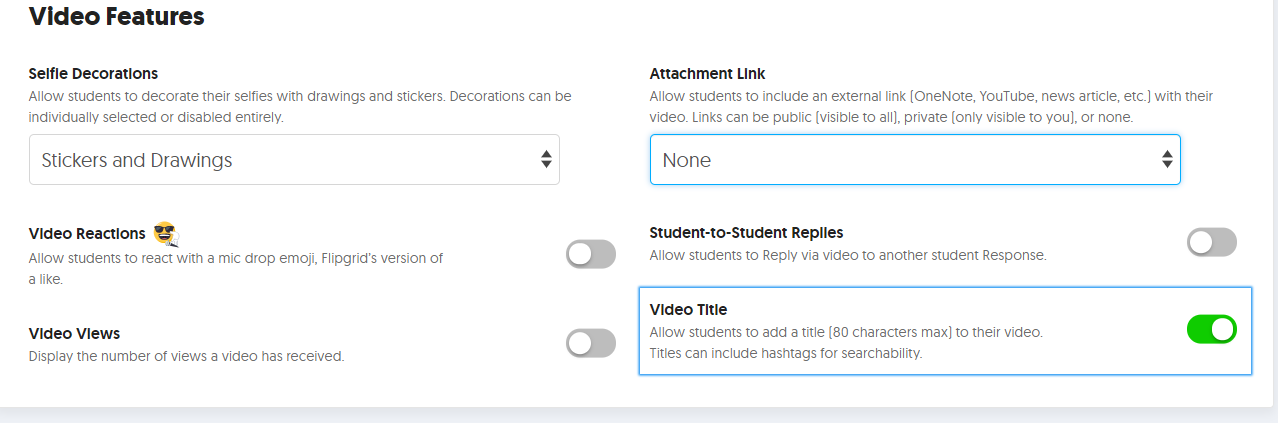
In the video features section, I do turn a few items off.  I keep the stickers and drawings option, but you may want to turn it off the very first time students ever record.  I turn off video Reactions, Video Views, and Student to Student Replies.  I do this so students don't get distracted with these items.  Once my class has used it a couple of times then I will add something and explain the rules in using this.  The Student to Student Replies is VALUABLE!  For example, you could have students read their essay and assign another student to listen to it, that student could then provide feedback.  You do need to teach your students what feedback is versus criticism.  I also change the attachment links to none.  The very first time I limit what is on.
This section I leave just like it is.  This will allow you to give students feedback to a response.  It's that simple to create.  If you'd like to experience Flipgrid as a student, go ahead and join my Flipgrid, tell everyone how you will be using Flipgrid with your class.
When you go in as a student, try the immersive reader.  Since it's owned by Microsoft, it has the immersive reader button.
Once students submit answers you will get email notifications, if you don't want your inbox to be filled with Flipgrid emails, you can turn off those notifications.  Click on the actions button on your grid. Then click on Grid Notifications, here you can turn the notifications off.  If you work with another teacher, here you can add them as a CoPilot which would allow them to see the student responses.  They MUST sign up for a Flipgrid account themselves before they can become a CoPilot.

Flipgrid gives you many resources, my favorite is their Disco Library, teachers have shared resources/assignments.  You can use one of the premade ones.  You also can click on Mix Tapes and create your own "Mix Tapes", I do this when I want to pick a few student responses and would like to share it with another teacher, this way he/she only has to listen to the ones that I want them to listen to.  #GridPals is another one that is great, we are moving our students to become global learners, what better way than connecting with a student in another state or country?  You can look at the map and connect with schools around the world.

It's that easy! Give it a try, your students will thank you!


Friday, June 1, 2018

Student Council Ballot Using Google Forms

I have been involved in our student leadership for years.  The last couple of years another teacher has been training to take over this role.  The one thing that I've still been in charge of was our student council elections.  With help from another teacher, we would print ballots then have teachers count their class totals, then the two of us would tally those totals.  Of course, some teachers would not have time to tally their totals, leaving us to tally each vote.

 Last year's race was so close we had to determine a tie for historians.  We recounted votes several times, each time one of the candidates would win by one to two votes.  So we finally said, "It's elementary school, it's not that serious, let's call it a tie and they both win."  This year, I wondered if there would be an easier way to count the ballots.  Google being my friend I decided to play with the thought of creating a ballot in Google forms, this way it would count the votes the two of us wouldn't have to do this!  So, I created a mock ballot with a few names sent it out to teachers and asked them what they thought of the ballot.  I got great feedback, one teacher suggested we add photographs of  each student near their names, since some students don't share the same recess or lunch, they never get to know each other.   What a great idea, but how would I get every student's picture in the form?  I thought I'd just have teachers send me pictures.  Then I started thinking about what would most likely happen, I'd get different sized pictures.  Everyone knows that there are those teachers that we work with that are never on time, so I also envisioned not getting pictures in time for me to put in the form.  It actually took me several days to brainstorm how I could get similar pictures of similar size in the form.  Then I thought of it!   We have our student attendance system which has pictures of all students, the problem was I only have access to my own students.  So, I asked the school secretary if I could sit at her desk and access pictures to put in my Google form.  That worked!  I then shared the link with teachers and asked them to vote, to make sure it worked.  No problem!  Now the teachers just needed to share the link with students.  Here's what students saw on their ballots:


As they scroll down the ballot they see the other offices and the candidates.  Teachers were very pleased about how quick it was for students to vote.  AND best of all no tallying of the votes!  Teachers who use Google classroom added an assignment and put in the link I shared with them.  IMPORTANT:  Make sure in settings you choose, "Limit to 1 response".  This will allow students to only vote one time.

When I was ready to view the results, it was so easy to get totals.  I clicked on the response tab and here were the results all tallied for me.

If you'd like to see how I created this ballot watch this video and I will show you step by step.

Sunday, October 15, 2017

Green Screening with DoInk is so Easy!!!! (Can Green Screen be a Verb?)

I have been giving trainings within my district for years on how to film on greenscreen.  There are many apps out there, but I'd say the easiest to use would be DoInk and using an iPad.  I have taught kindergarten to fourth grade and they have all been able to do this.  If you only have Chromebooks you can get WeVideo from the Chrome Store, there is a monthly fee.  I have played with that app once, so I'm not as familiar with it, so today's blog will focus on DoInk.  The DoInk app looks like this:
The app is a one time $2.99 at the time of this posting, but as compared to apps through the Chrome Store, this is cheap.  Once you have this installed all you really need is your iPhone or iPad and a green piece of butcher paper, once you start playing and if you use it frequently you will want to start making a few investments.  These are my recommendations:
Again, none of these things are necessary, it just makes filming easier and easier if you are allowing the kids to do this themselves.  A microphone should be one of your first purchases, as you begin to film you will see how handy a microphone is, if you are filming in a workstation or center, you will be picking up the other students in the background.  If you have a microphone this eliminates A LOT of background noise.   You want to find one with a long cord, this way students can stand close or far from the iPad.  I had a teacher at a training, say, "Well, I'm going to be filming my small group, so I'd need to buy 5 microphones, right?"  No, your iPad only has one plug source, they do make a dual lapel microphone, for two kids.  If you are filming a group, then students can pass the mic to one another OR a great microphone, is the Yeti.  I love mine, but it will pick up background noise, so I use this only when I have a group presenting to the class and the class is a silent audience.  All of these things add up.  Write a DonorsChoose for a greenscreen project!

 A tripod should be your second purchase.  When the students start filming, you'll see it is quite shaky.  An iPad or iPhone, won't just mount to your typical cheap tripod, you will have to get an iPad tripod mount.  Most of these are adjustable in size, I know mine will slide down small enough for my phone and large enough for my old large iPad.

You can always use green butcher paper as your background, but you will need to watch if it has wrinkles in it.  The wrinkles sometimes reflect the light and you will then get see through parts, or the wrinkles are visible when you are taping.  If you purchase green fabric (cheapest) the wrinkles are not picked up, because the cloth does not reflect the light.

A gooseneck iPad mount is helpful, if you will be filming students using puppets or other small items at a table.  I have a pizza box that I have covered in green butcher paper and then they can film in front of it on a table top.  The gooseneck mount can be mounted on the table and used as a tripod.

Again, all of these things are not necessary, but all can be found on Amazon.  If this is your first time, I'd suggest using green butcher paper and see if this is something you even want to attempt a second time.

OK, let's get to the fun part.  Once your app is installed you are ready to begin.


Let's first practice by taking a still picture.


This is the next screen:
You are now ready!
Congratulations!   You've taken your first greenscreen picture!!!!!


Video recording is the same steps as above, just make sure instead of image you pick video:

Now pick which type of back ground you want, you can either film a background, insert a background or movie from the internet, or take a photo of a drawing or any photo.
You must have the layers in the correct order.  What you want to appear in the front will be your first layer, your background the second.  You can have up to 3 layers!

That's it!!  Even if you can't figure it out, give it to your students for a little while, they'll have it figured out in seconds.  :)

I get a ton of my ideas from following @doink on twitter.   People are so creative!

If you liked this blog you might want to follow me or following me on twitter @gina_hickerson.
You might want to check out my TPT store.

Sunday, August 27, 2017

Decibella and her 6-inch Voice

I started school about 2 weeks ago.  This year my 4th grade class is extremely talkative.  My partner teacher has also said her class was very talkative.  She recommended I read a book to my class, Decibella and her 6-inch Voice by, Julia Cook.  It is a picture book.
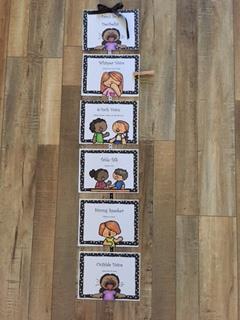
My kids loved this book and now instead of referring to voice volume with numbers we now refer to them  as either whisper, 6-inch, table talk, strong speaker, or outside voice.  In fact, they loved it so much I decided I'd make a reminder for them.

I have hot glued each little poster onto a ribbon and move the clothespin to where I expect their voice volume to be.  I have created these in full sized sheets and half size sheets, if these are still not the right size for you, when you go to print you can click on "More Settings", then in layout choose anywhere from 2-16 pages on one sheet, this will make the images smaller upon printing.   You may choose to just put up the voice volume poster you expect.  I have created these posters full page and half page.  I have also included one sheet with all of the volumes.
I could have easily used this in kindergarten.  My fourth graders have responded very positively to this, too.  If you are interested in this resource you can find it here.

You may want to visit my store to check out other resources I have.  


Sunday, August 13, 2017

Which Are Your Favorite Apps?

Unfortunately, I only have two iPads for my classroom.  I currently have written a Donorschoose.org project for two more and have my fingers crossed that I will get those.  I don't think I have to tell a teacher why having iPads in the classroom is so great, but if you don't have any maybe you aren't aware of all of the things your students can do with them.  So I thought I'd highlight five of my favorite apps I have on those two iPads that I use with students.

My all time favorite app is doink.
This app allows your students to create greenscreen projects.  The app is $2.99.  I have used this app when I taught kindergarten, first, and now fourth.   I could teach a kindergartener how to film using Doink and allow this to be a center in my classroom.  So, I know any age group can use this app.  My fourth graders do amazing projects on it.  Our school has a Deaf and Hard of Hearing program on campus.  Last year I mainstreamed.  This app was absolutely great!  I had the child sign her mission report, her mission was the backdrop!  The interpreter, interpreted into the microphone, you should have seen the pride in her face when I played back her report.    Last school year, we trained teachers on how to use this app, you should have heard the laughs as we played with this app.  Some fun items to use with it, is a green suit, I bought mine on Amazon for $9.99.  You can also paint pizza boxes green and now you have a small greenscreen.  You can use the stir sticks from Starbucks or paint straws green and students can glue their art/puppets to them and film.  The items that make this app easier for kindergarteners to use are a tripod, an ipad mount, and a microphone.  I get many ideas by following @DoInkTweets on twitter.

The next app that I love is Seesaw:  
I downloaded this app years ago, but only began using it last year.  This app is free and is also web based.  This is basically a digital student portfolio.  Students can upload their own classwork.  You can also have students share, so you could ask a student to explain a math problem, then allow other students to comment on it all digitally.  So very powerful!   You can connect parents which allows them to see their student's work.  You can also use Seesaw to communicate with parents.  If you'd like to see what Seesaw can do, check out their youtube video.  I joined the facebook group Seesaw Teachers, here people post all types of ideas of how they are using the app.  Seesaw also has many webinars to teach you step by step how to set up your classroom to how to use it.  I also follow@Seesaw on Twitter.

I also love Tellagami:
This is another app I have used in kindergarten, first grade, and fourth grade.  Tellagami has a free version, but I'd say the $4.99 purchase for Tellagami Edu is well worth it.  This app is especially great when the parent is not okay with photographs.  In this app students create an avatar and then speak into the iPad to record their voice.  If you have students that are non-communicative they can type in what they'd like to say and the app will speak for them.  When I taught kindergarten, the autism program mainstreamed into my room and I had a student who was non-communicative, but he was able to do a farm report in this way. I follow @tellagami on twitter for ideas.

 The last app is one that I use, but the students love when I use it.  It's Teamshake:
This app is $0.99.  I only started using this three years ago, so I've only used it in fourth grade.  To use this app you add your class list.  It will create groups for you, you tell it the size of the group and you shake your device and up come the groups.  My students know when I grab for my phone, they all will say, "Shake it up!"  I shake it and then tell them which group they are in.  

If you haven't tried out these apps, I hope you give them a try!  

You may want to check out my TeachersPayTeachers store.  


Sunday, May 7, 2017

Brainstorm, List, and Write!

I have found this method very helpful when teaching writing to our littles.  Some struggle with ideas, others struggle with formation of letters, and some struggle with sounds in words.  This strategy helps those strugglers.  I begin with the whole class and I often start by having the class watch a video about the topic.  For example, if we are writing about pigs, I might show this video Pig Video.

After the video we will brainstorm what the students have learned, or what they already know about pigs.  I have some butcher paper with the topic in the middle ready to go and will record what students say.  Before they begin raising their hands to tell me the answers, I ask them to turn to a partner and share ideas.  This way my students who are learning English or need time to think, can hear an answer given by another student before answering.  When we are done, it looks like this:


From here we begin to make lists.  They have already generated some things when they brainstormed, I put the brainstorm paper next to my list paper.  Now we begin to categorize them by what pigs, "have", "like", and "are".   Again, before I pick students I will tell them, "We are going to list what pigs have, tell your elbow partner something pigs have."  I ask students to answer in a complete sentence. As they say their sentence, I point to the word "Pigs", the word "have" then write the word they are say.  In doing this we are checking that it goes under the right list.  We do one list at a time.  Sometimes, I will fold the paper in thirds and only have the one list visible.  When we are done the completed list may look like this:


I put the subject in black  and make each list a different color.  Then we practice by reading the sentences we can make.  So a simple sentence that may be made would be "Pigs have curly tails."  I model this by showing students how I write the black word and then pick a list, first copy the word in the rectangle then pick one word under that.  This way students do not just copy everything.  I can now easily teach students who get how to make a simple sentence to make it more complicated for example, Pigs are omnivores, smart, and cute.  I can also teach students to add because.  Many of my student's know how to spell "because", I sing a little song to the tune of "Twinkle, Twinkle, Little Star".  It goes like this:  "b-e-c-a-u-s-e, I can spell because."  It's simple, but for some reason catchy.   Those students who are ready may write something like, "Pigs are omnivores because they eat meat and vegetables."  I encourage students to sound out all words by themselves.  This gives them sound practice and I can also see who is having sound/letter confusion.  This simple method has proven helpful to my little writers.  I hope you give it a try and you find it helpful for your littles, too.

If you're interested in giving it a try you may want to visit my store.

Or try these specific resources from my store:  Martin Luther King Writing


Saturday, March 11, 2017

Yay! For Google Forms!

This week my amazing principal, hosted a Tcubed workshop.  What is this you are wondering?  Well, it is Teachers Teaching Teachers and she set it up EdCamp style.  Teachers got to choose their own learning and decided which sessions they would attend.  I was asked to present, I would only have 25-30 minutes.  Another amazing teacher from a neighboring district shared something pretty cool with me.  I have been using it ever since.  So I decided, since, I found this useful so would my colleagues.  (I was a little afraid it was something boring to share)  It was Google Forms, in the past I've used it to create a quiz and put it in my Google Classroom.  I've used Google Forms for quizzes when I want something super quick because the spreadsheet makes it super easy to correct a whole class in minutes.  BUT this amazing teacher found another use for google forms.  Ready for it....he uses it to collect data on behavior.  As soon as he shared this with me, I used it and I was amazed.  My student who I thought was having problems all day long, nope, it turned out most of his behaviors were happening during transitions, because Google Forms date and time stamps when you enter information you can track when the behavior is occurring.  Ready for the most amazing part?  You can upload the file to your phone.  Did I hear you say "WHAT?  I don't have to follow my student with a clipboard and annotate what just happened?"  No, you don't, this is the most amazing part, you can have the form on your phone and then just check a few boxes and data is collected!  The students just think I'm adding ClassDojo points, they have no idea I'm collecting data on a child.  When I presented this, I had a special education teacher let me know - I just changed her life!  She emailed me the next day and said she stayed up until midnight creating forms.  :)

OK, so now you ask, how do you do this?  Watch the link and I'll show you how to create the form.
How to create a form on behavior

Want to see how to upload it on your phone?
Upload behavior form to a phone

The very first time I ever created a form for a quiz, I can't remember how long I looked around in my drive, but it was quite a while.  It's not there.  You must go back into your forms app and then you will find it.  On the first line will be the forms you most recently viewed or edited, below that will be all the forms you have ever created.

Now, what happens if you've created a Google Form and you'd like to change it.  No problem.  When I created mine, I had put a place to write in.  I realized I never used it as it took too long to type out a response.
Making change to a form that you already created

So this is great for classroom use.  As a principal, how great would it be to have a form similar to this to check off for walk-throughs?  All data would be right there in a spreadsheet.  Wow!  The possibilities are endless!

I hope you find this tool as amazing as I did.  Who knew google forms could be used for more than creating a quiz or survey.  Yay! For Google Forms!